Recipe: Chocolate Sponge Cake with Chocolate Mousse and Chocolate Leaves
Level: Intermediate/Advanced
Techniques: Sponge Cake, Chocolate Mousse, Chocolate Tempering, Chocolate Piping
Time was not on my side when making this recipe. In hindsight, I should have attempted this over two evenings. I almost became hysterical at a few stages with this one. It certainly earned its intermediate/advanced rating.
Ironically, the chocolate leaves (if you squint they look a bit like leaves) were the easiest part of the recipe. The part that challenged me the most, was the advanced level cake I chose to make that was meant to showcase the decorations. Hopefully I’ve learnt my lesson for next time.
I began by making the chocolate sponge cake, the first thing I noticed is that the cake didn’t have any fat in it. This is not the norm for British baking, however on further reading, I found this to be very typical of French baking. They prefer instead to whip the egg whites and use this to raise the cake.

Another interesting addition to this recipe is the inclusion of corn flour. From memory, I haven’t ever added this to a sponge cake recipe. A bit of research seems to suggest that the addition of corn flour makes the cake lighter and absorbs any extra moisture, keeping it airy and light.
The cake itself was relatively easy to make. I committed the common mistake of whisking the egg whites on too high a speed setting and splattered the kitchen with some of the eggy sugar mix (joy)! After the excitement of that, I folded the egg whites into the yolks, which I had already beaten with the remaining sugar. I then incorporated the sifted flour, baking powder, cocoa powder and cornflour blend into the egg mixture.
Once it was all combined I put it in the oven to cook. Smugly satisfied, I wiped down the kitchen walls and moved on to the mousse. From reading through the recipe – mise en place – I knew that the mousse needed two hours in the freezer to set before I could then decorate the cake with my leaves.
This was another recipe in the book that required me to have at least 3 pairs of hands. I was somehow meant to create a sugar syrup, to add to egg yolks that were being whisked, whilst also melting chocolate over a pan of boiling water. Thankfully the cream could be whipped after the other three were combined.
So I got my chocolate ready in a bowl over a saucepan of water, whilst I stirred the sugar syrup (which needed to reach a temperature of 118˚C) with one hand and also whisked my eggs with the other. What could possibly go wrong?
Well, I kept an eye on the temperature of the sugar syrup whilst still whisking the eggs, this resulted in more kitchen splattering. I then almost dropped the thermometer in the syrup. After retrieving it, I managed to somehow flip it up in the air and spray my skin with sugar syrup exceeding 100˚C but not quite reaching 118˚C. Oh the irony!
After cursing and cleaning myself up, the syrup was now ready. I poured it gently into the eggs and continued to whisk at a high speed as instructed. The syrup set the moment it hit the eggs, clogging the whisk and splattering liquid everywhere. I had to strain the sugar crystals out of the eggs and make the syrup again. This time heating it to a lower temperature and adding it to the eggs. This worked.
My chocolate was now melted, I added it to the egg/syrup mix and stirred it all in until it was smooth and glossy. I then had to whisk the cream, by this point the majority of the kitchen needed wiping down, so the mess from the cream was barely important enough to register. I folded the whipped cream into the chocolate mixture and my mousse was complete.
My cake had now finished cooking and was cooling on a rack. I gently sliced it in half to find that the top half of the cake wasn’t cooked, despite my testing it with a cocktail stick. Grr.
I was losing the will to live by now. I returned the sliced top half of the cake to the oven for a further 10mins to cook it through.
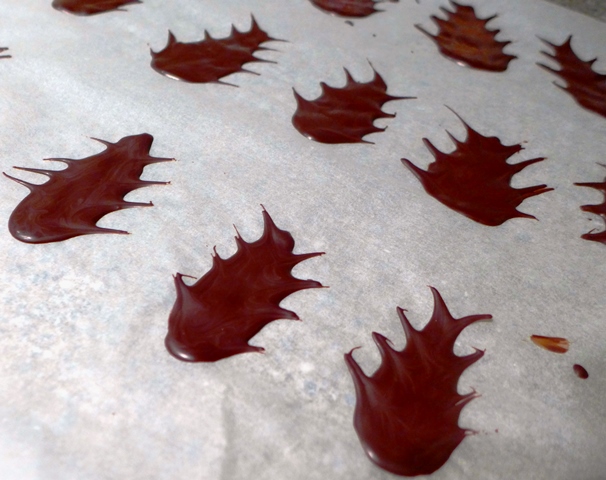
I thought this would be a good time to temper my chocolate for the leaves. As I don’t own a slab of marble, I decided to go down the route of melting the chocolate to 55˚C (for 70% cocoa) and then adding chocolate in pieces to cool the temperature down to 29˚C. The idea behind this is that it’s meant to produce a shiny finish and the chocolate will still have a crisp snap to it.
The leaves were pleasantly simple to make. I piped out tear shapes on greaseproof paper and then used a skewer to fan out the chocolate to give the illusion of leaf detailing, as directed by the book.
By the time I had finished this, the top half of my cake was cooked and I put it on a rack to cool. After waiting a little while, I started to sandwich the cake together with the chocolate mousse.
Big mistake. I hadn’t waited long enough and the cake melted the mousse instantly. Thinking quickly, I placed the cake in the freezer, put my mousse in the fridge and carried on with piping my leaves.
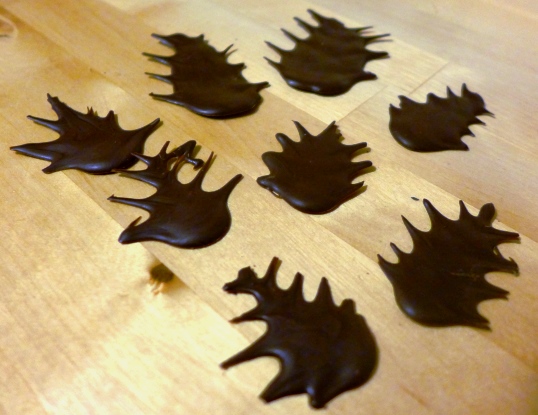
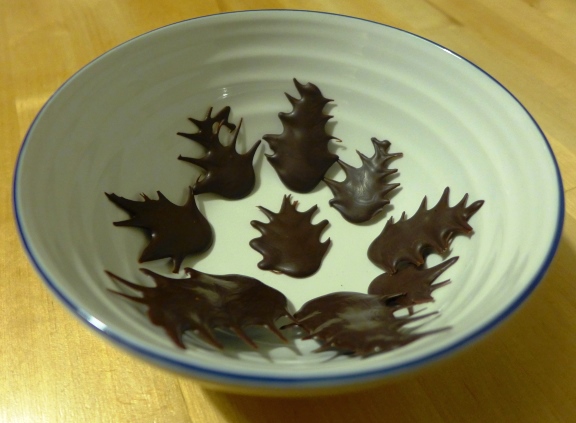
The leaves were much more robust than I expected. They came off the greaseproof paper easily and you could actually use them to decorate a number of things from individual desserts, through to a whole cake, it really is down to personal preference.
After piping out around 30 leaves, the cake had cooled in the freezer and I could finish decorating it with the mousse. Using an offset spatula I spread mousse all over the cake. I then decorated the top of the cake creating a wavy effect using a bread knife. I returned the cake to the freezer and left it to set.
I used the free time to wipe down the walls (again), clean up, and breathe a huge sigh of relief that I got away with the cake and the mousse shenanigans and all was not lost.
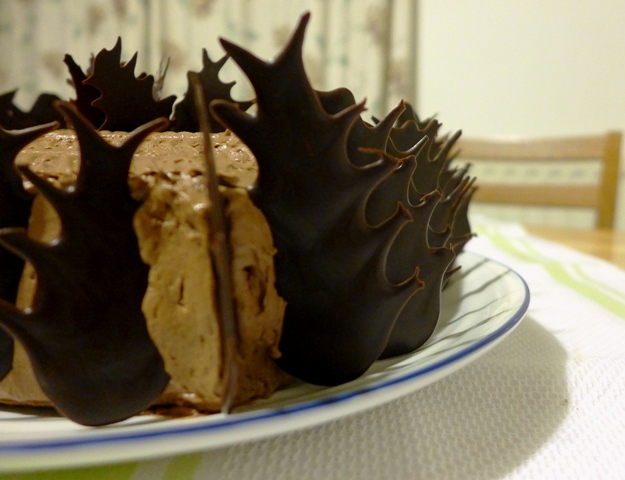
When the mousse had set, I got the cake out of the freezer and decorated it with the chocolate leaves.
This was a delicious cake, the fatless sponge was light and fluffy and was complimented by the rich yet light chocolate mousse. The crunch of the chocolate leaves added another texture that was needed. This is my favourite cake so far.


Next week is another chapter in the book, Les Gâteaux Classiques and I shall be making Tiramisu à l’Amaretto.
Thanks for reading.
Angela
Leave a Reply